Close your eyes. Imagine the scent of sweet strawberries and rich cocoa wafting through your kitchen.
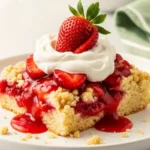
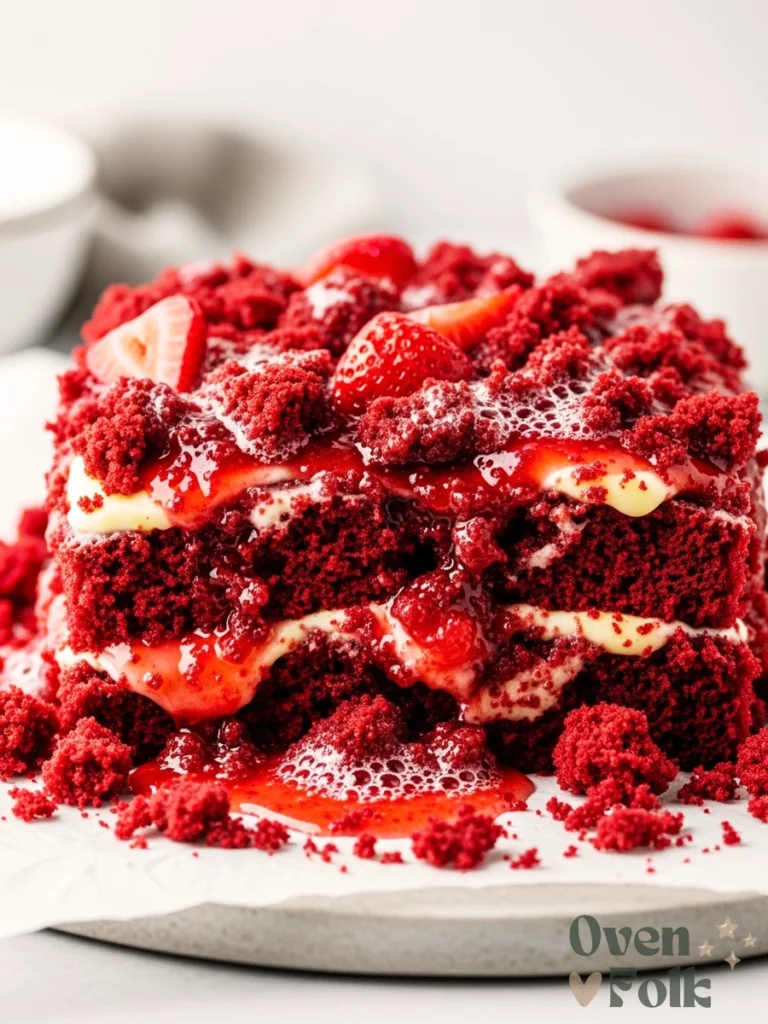
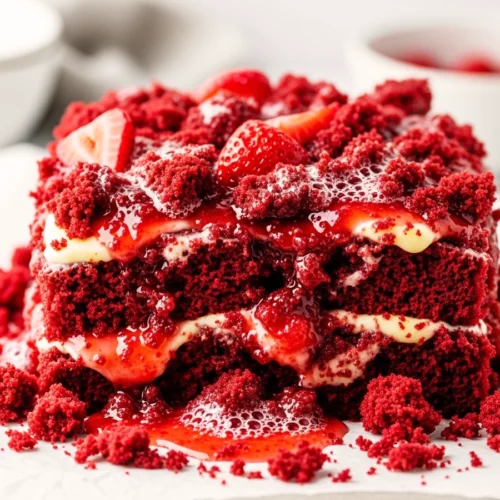
Picture a dessert where a buttery, velvety crust yields to a bubbling, bright red fruit center. It’s decadent, it’s beautiful, and it tastes like you spent hours in the kitchen.
But here’s the secret: you didn’t.
We know the feeling. You need a stunning dessert for a potluck or Valentine’s Day. But, you have zero time to measure out flour and sugar.
The “dump cake” is the busy mom’s best friend. This Strawberry Red Velvet Dump Cake version is the crown jewel.
It solves the problem of dessert fatigue. It offers something that looks sophisticated but requires no mixing bowls. There is almost no cleanup. It’s the sweet, stress-free victory you deserve at the end of a long day of juggling a million tasks.
At-A-Glance
- Dietary: Vegetarian
- Time: 45 Minutes
- Difficulty: Beginner
- Cost per serving: $0.95
Why This Recipe Works
The genius of a dump cake lies in the interaction between the dry cake mix and the fat from the melted butter.
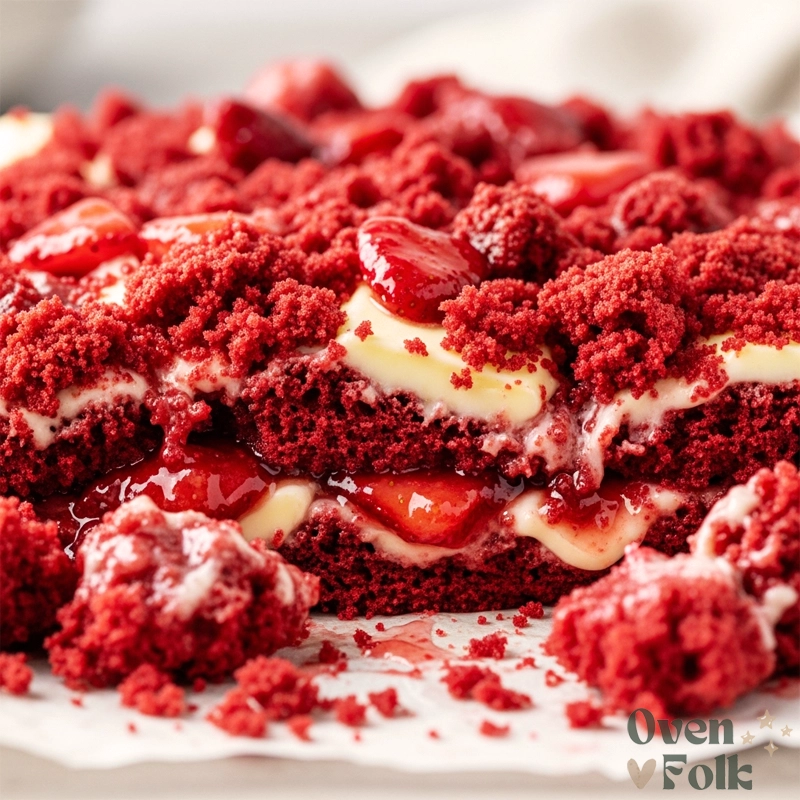
By layering the dry red velvet mix over the moist strawberry pie filling, the fruit’s juices hydrate the bottom layer of the cake mix during baking. This creates a soft, cobbler-like texture.
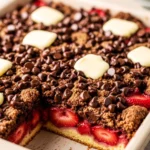
Meanwhile, the butter drizzled on top creates a crumbly, slightly crisp topping. It mimics a high-end streusel.
We use red velvet specifically because its mild cocoa notes provide a sophisticated earthy undertone. This prevents the strawberry filling from being overly cloying.
Unlike a standard cake that requires aeration through mixing, this recipe relies on the steam from the fruit to lift the batter. This results in a dense, pudding-like consistency that is incredibly moist. It’s a chemical reaction that guarantees success every time.
Key Ingredients & Notes
- 21 oz (595g) Strawberry Pie Filling: The base of our cake.
- Chef’s Tip: Ensure you use “pie filling” and not just canned strawberries in syrup for the right thickness.
- 15.25 oz (432g) Red Velvet Cake Mix: This provides the color and flavor.
- Chef’s Tip: Sift the dry mix if it looks very lumpy to ensure even cooking.
- 3/4 cup (170g) Unsalted Butter: The magic binder.
- Chef’s Tip: Slicing the butter into thin pats works even better than melting and pouring for a crusty top.
Equipment Needed
- 9×13 inch baking pan
- Spatula or spoon
- Butter slicer or knife
Step-by-Step Instructions
- Preheat: Preheat your oven to 350°F (175°C). You don’t even need to grease the pan, but you can if you want extra insurance!
- Dump: Dump both cans of strawberry pie filling into the bottom of the pan.
- Spread: Spread it out with a spoon so it covers the entire bottom surface.
- Sprinkle: Sprinkle the dry red velvet cake mix evenly over the top of the strawberries. Use your fingers or a fork to level it out, but don’t stir it into the fruit!
- Layer: Layer thin slices of butter over the entire surface of the cake mix. Try to cover as much of the powder as possible. Don’t worry if it looks messy; it’ll melt into perfection.
- Bake: Bake for 40 to 45 minutes until the edges are bubbling and the center is set. Let it cool for 10 minutes before serving—it’s worth the wait!
Expert Tips
Trust the Bubbles: Don’t pull the cake from the oven until you see the strawberry filling bubbling vigorously around the edges. This is the sign that the cake is hot enough all the way through and the center is cooked.
Cold Butter is Non-Negotiable: The “Butter Slice Hack” only works if your butter is firm and cold. This allows you to slice it thinly and create an even layer. Do not use softened or melted butter, as it will create greasy pools and leave dry patches.
Don’t Skimp on the Butter Coverage: When laying out your butter slices, treat it like you’re tiling a floor. You want to cover as much of the dry cake mix as possible to ensure the entire top becomes a golden, buttery crust.
Let It Rest to Set: The most common mistake is serving a dump cake piping hot from the oven. The fruit filling is like molten lava and needs at least 15 minutes to cool and set up. This will give you a perfect scoopable consistency instead of a runny mess.
Variations & Substitutions
- Dairy-Free: For a Dairy-Free version, use a plant-based butter substitute. Also, check that your cake mix doesn’t contain milk powder.
- Add decadence: You can also add 1/2 cup of white chocolate chips on top for extra decadence!
FAQ
Can I use frozen strawberries instead?
It’s not recommended because they release too much water. If you do, mix them with 1/2 cup of sugar and 2 tablespoons of cornstarch first.
Do I follow the instructions on the cake box?
No! Ignore the eggs, water, and oil listed on the box. We only want the dry powder.
What should I serve this with?
A scoop of vanilla bean ice cream or a dollop of whipped cream perfectly balances the richness of the red velvet.
Recipe updated in 2026 to reflect the most accurate timing and additional insights.
Strawberry red velvet dump cake
Equipment
- 9×13 inch baking pan
Ingredients
- 21 oz Strawberry Pie Filling
- 15.25 oz Red Velvet Cake Mix
- 0.75 cup Unsalted Butter
Instructions
- Preheat oven to 350°F.
- Spread strawberry filling in pan.
- Cover with dry cake mix.
- Top with butter slices.
- Bake for 40-45 minutes.
Notes